Showing posts with label dyeing fabric. Show all posts

Monday, February 4, 2013

Ancient Cactus


In one of the groups my theme for 2013 is Up Close and Personal. I am using 6 of the most favorite macro shots I've taken and making them into art quilts. I'll be posting the completed art along with the original inspirational photograph.

And here is the first. The photo was taken on a trip to Texas. We were walking along and saw this scarred and beaten very old cactus. I got a very close up shot of a few of the leaves. I've always loved this photo and the resiliance portrayed. An old cactus, well worn over time, yet still growing. An inspiration worthy of an art quilt I think.

ANCIENT  CACTUS

original photograph

I used simple quilting so as not to detract from the scars on the leaves. All the scars are reverse appliqued.On the largest scar, I pleated the light gray fabric before doing the reverse applique on the black for the deeper cut (see below).  I even let the fabric pucker as I stitched it because I felt it enhanced the age of the cactus.  The "thorns" are hand embroidered. All the fabrics are my own hand dyed cottons.

Ancient Cactus - detail
 

Wednesday, January 16, 2013

Completed Today

The challenge topic - Favorite Movie

This sounded easy at first but proved to be a bit difficult. Many of the movies I love and the parts that make me love them are more concepts and not readily expressable (a new word I just made up!) in 2D art. But someone reminded me of Fiddler and I knew at once that was what I wanted to do.

I love this story. I laughed...I cried.  And many of the lines and songs from this movie are a part of our life now.  One of my favorites is when Tevia is talking to God in the barn about wishing he were a rich man.  "Would it spoil some great eternal plan...if I were a wealthy man?"  And the relationship with his wife and the loves of his daughters...so many faces of love and devotion.

Fiddler On The Roof - Kelly

This piece has all kinds of my own fabrics - hand-dyed, snow-dyed, discharged, ruching, confetti dyed, stamped, drawn on, painted. Only the fiddler is not my fabric but black Kona.

I have a couple of other pieces that will be completed by Monday. LOTS of handwork these coming evenings!

Saturday, January 5, 2013

Productive Day

Just checked on my ToDo/Done list and it has been a very productive day!!


Block printed 3 wolves, 3 apples, 3 rice 
Cleaned off Island 
Prepped Brown Snow-dyes 
Cut muslin for an upcoming art piece
Decided on images for that piece
Cut muslin for Pecans – Sapling and marked off boundaries 
Chose concept for SAQA Text Speak 
Set Snow-dyes for batching 
Evaluated Show/Exhibit CFE schedule 
Stitched first piece to Up Close and Personal 
Overdyed green experimental piece 

Blogged and blogged and blogged

Here is my latest on the Minneapolis Manhole Cover Project which is one of my three series I'm working on this year.

Block cutting completed on Wolf

Background fabric (a snow-dyed piece made especially for this project. Seemed appropriate for a Minnesota project!)

Wolf printed onto fabric with Speedball Block Printing Ink.

I use an oil base printing ink so Woflie has to dry overnight

While I had the ink all out and ready...I also printed the Apple and Rice manhole covers for this project and two other prints of all three of them for two other projects.  Now I'll be ahead on those!!

Experiment for the week

After a session of snow-dyeing I had not cleaned up right away.  As a result the dye that had dripped from the snow-dyed fabric had dried to the bottom of the tray.  I thought the pattern was intriguing and "wondered what would happen if".....I just put some SA soaked fabric down on it to dye the fabric.

Here is why I was so intrigued by the patterning of the dried dye...


And here is the result of placing the SA soaked fabric onto the tray and just patting it down to connect as much as possible.


Cool or what!!!??  Now I'm going to overdye it with some light green....or perhaps a lighter blue....we'll just have to see what happens!!  I haven't decided yet.

Friday, January 4, 2013

Finishing out 2012

Yep...I'm a few days late (and after Christmas.....more than a few dollars short!!  LOL!!) but this one is my last piece to complete my challenges for 2012.

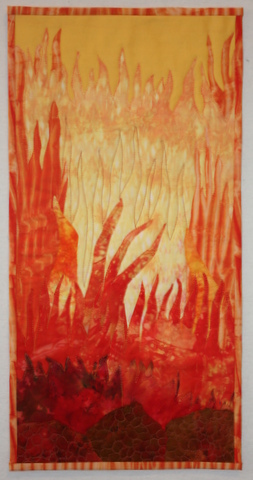
A Burning Passion - This is my last VoyageArt piece for 2012 where the theme was to be Who Am I?  After such an amazing year, I seem to have discovered that art is definitely my Burning Passion.  So what better way to complete my self-disclosure?  It also is a great catapult into 2013 because I will be concentrating MUCH more of my time on my art this coming year.

Fabrics in this piece are my hand-dyed ruching and pole shibori and a few other hand-dyed fabrics from my stash.  Size is 10" X 20".  This isn't the greatest photo....cuz I took it.  I can hardly wait to have it done professionally by Shawn Nielsen (see link in right sidebar!!) later this month!!  LOVE the difference it makes!

A Burning Passion

Now onto all my fun plans for 2013...unencumbered with any unfinished projects!! I'm so excited about my series, etc for the coming year I can hardly wait to get started!!

Sunday, December 16, 2012

And the Snow Tree is done!

FINISHED!! Have to say...this is one of my favorites. The theme for this challenge was Snow.  After receiving a foot of the beautiful white stuff. I was inspired both for the technique (snow dyeing) and the subject matter.

I cut the tree out of a white-on-black commercial fabric, I had a stone fabric which made a perfect wall. The snow is cut from all black-on-white commercial fabric. Each piece is individually applied to the background as raw edge applique.  I love the feel of a cold gray day the background gives, with big clumps of wet snow clinging where it can.  I also like how the wavy cut of the woven fabric background gives a feel of the cold winds of winter in the frozen northland.

The front fabric is folded to the back and stitched instead of a usual binding.  I didn't want to break up the tree or distract from it.

SNOW  TREE
12" X 12"

Friday, December 14, 2012

Snow! Glorious Snow!

In abundance and just 2 steps out of my door!

Did a snow dyed backing for the gray woven background piece.  Continuing with my addiction to have a backing that goes with the front whenever possible!


Also did three snow dyed pieces for the Pecans series.  I LOVE them!! And I know they will be very useful to mix in with all the others since I used the same dye mixture.  Also, decided to add a couple of my favorite rusted pieces to the pile of available fabric for Pecans.  Think they might add an interesting bit once in a while.
Snow Dyes

Rusts

Now to see what other trouble....I MEAN...creativity I can get into with this series.........


Thursday, December 13, 2012

Pecans - the beginning

Pecans - the series.

A couple of the online groups I belong to are doing art pieces in a series as part of the challenge for the year.  For one of the groups, Free Spirit Artists, I decided to do a series on Pecans.  This fall my dad died. He was a wonderful man and a great loving dad. And one of his passions was pecans.  They had a HUGE very old pecan tree in front of their house and he even planted a pecan orchard.  He subscribed to magazines for pecan growers.  Oh and he enjoyed eating them as well!!  (something we had in common!!) So, I decided to do this series in honor of my dad.

So far the series will depict the  different stages of the pecan.  1) sapling, 2) a grown tree, 3) mature pecans on the tree limb, 4) pecans on the ground at the base of the tree - ready to harvest 5) a barren tree after all the pecans and leaves are gone 6) pecans harvested and halved, etc and 7) the piece honoring my dad - it will have his photo in B/W transferred to silk organza, pecans, perhaps other photos, and my mom's pecan pie recipe.

Well....I have done a bit on this series already.  Ordered screen prints, cut out templates, etc.  But dyeing the fabrics felt like the project is actually underway.  After a couple of days of dyeing....here are the basic fabrics I will be using in all of the pieces in this series (6 or 7 planned)

They are all dyed in a 6 step gradation.  Here is one of the brown all set up to batch.


And here are the completed dyed fabrics --

Browns (yes I know some of them don't look brown but they are named "brown" something) -  From left to right...Tobacco, Cocoa, Golden Brown and Dark Chocolate Brown


Greens - Left to Right...Emerald, Dark Green and Forest Green


And Blues - Left to Right... Well actually they are so close it is difficult to tell the difference even in person! But I used Cerulean and Intense Blue.  I took these down a couple of gradations because I wanted some light blue sky with "clouds".  I'm very happy with the results.


Ordinarily this would be the end of dyeing...however after just completing the snow dyeing for another challenge...I HAVE to do some pieces for this series!! Hopefully I'll get to that tomorrow if not starting some today.  

Wednesday, December 12, 2012

Snow Dyed Woven Background

One of my challenge groups has the theme "Snow" for December.  Well.....I mean I HAVE to snow dye the fabric for that one right????  AND we DO have enough snow!!!


First I have to prepare a place to put the whole snow dyeing process.  I like the melted snow and dye to drip below the fabric so that the fabric doesn't bathe in the dye.  One thing I say...."the right tool for the right job".   I'm so glad I picked up those big tin snips when they were on sale years ago!!!  The metal mesh is for a leaf shield on gutters.


Then I just placed the scrunched up fat quarter of PFD that had been soaked in the soda ash solution onto the screen and covered it well with snow


I had mixed up two strengths of #44 New Black from Dharma.  Also added in just a smidge of blue dye in one and a smidge of purple dye in the other for just a bit of contrast.  Then just waited for the snow to all melt.
GOING...

GOING...

GONE!!!

Results side by side

A while ago I had done a woven background like this one with an abstract tree. I wanted to do something very similar for this challenge.  So on to weaving the background.

First I cut each piece to the appropriate size - this time 15"X15". I ironed MistyFuse onto the backs of each of the pieces. Then I use my rotary cutter to slice the pieces into wavy lines.  (NOTE: On one piece, leave one edge in tact to make weaving easier to control) Also...it is important to keep these strips in order so they will fit snugly when woven.


Next I started weaving the horizontal pieces into the vertical strips. I just go ahead and set this whole weaving part up on the batting so when I iron it in the final step...it is ready for the rest of the process without having to pick up the woven piece on its own. You can see the black MistyFuse on the back of the strips that are flipped up ready for the next strip.


It may be necessary to futz with each strip just a tad to be sure it is in there snugly.


And finally, when all the strips have been woven in (you probably won't have room for the last one or two pieces of your horizontal strips but it doesn't matter).  I iron it to fuse the strips together and the whole piece to the the batting.  I love the subtle play of the color in this muted background which will depict a gray winter day.


And here is a detail shot.


Now it is ready for the tree and the snow!!

Monday, October 1, 2012

Weekly Creativity - Week 4 - Confetti Dyeing

Ok, you just gotta try something that says "confetti" right? This is just one of the options for this process.

My original purpose was to obtain a background for a new art piece I'm working on.  Alas....neither of these new fabrics will work.  On to plan B for that project.

Stil...I do love the fabrics and KNOW they will find their way into my art and probably soon.

Here's the process

Soak fabric in soda ash
Place wet fabric in a flat container (so you can spread it out but it doesn't need to be totally flat)
Sprinkle dry dye powder onto the fabric (I used a mesh tea ball for this and it worked really well! still..it takes a light hand)
Scrunch the fabric up a bit more
Spray with a mix of water and soda ash (I just used liquid from the water/soda ash which I soaked the fabric in)
Let it batch for a few hours at least
Rinse, wash, dry, iron

And here are the results:
Confetti Dyeing - 1
This piece of fabric I left at the full 40" long

Confetti Dyeing - 1 - detail

This piece was way to dark so I thought I could try for a bit lighter the next time. Used a good bit less dye powder
Unfortunately, it is still too dark for what I need.  But, especially in the detail shot, you can tell why it is called "confetti" dyeing! The dye powders do separate into their component colors

Confetti Dyeing - 2

Confetti Dyeing - 2 - detail

I used white cotton PFD, Dyes (Ecru, Straw, Hollandaise, Bronze and Pewter)

Wednesday, August 1, 2012

Junk Junkie

OK...I teased you with the previous post (Can this be art....AND art quilting??).  Here is the result and yes...it is an art quilt!!

Again for one of the online groups I participate with - the theme for this year is WHO I AM - Like everyone, I'm quite a few "things". But one for sure is a Junk Junkie. I dumpster dive if I see something that catches my eye, pick up free things off the side of the road, LOVE Freecycle, thrift stores....that about says it. My poor long-suffering husband is at last used to piles of what seems to most people as useless stuff. Both he and my 4 year old granddaughter don't throw anything away unless they ask me first if I need it for an art project. I'm not altogether sure why old junk appeals to me and helps define what kind of person I am or at least what interests me. Probably a bit of the same reason I love falling down buildings. It's like I feel a sense of history and presence from another time. I try to imagine to whom it belonged in the past. Was it loved and cared for or just a utilitarian piece. I have a pile of rusted junk on the side of my house that I'm sure my neighbors question but if they could see this piece they just might understand.

I rusted white cotton fabric and then dyed it a bit with some cerulean blue procion dye. The large border/binding is a hand-dyed cotton of very close to the same blue. Both are from my stash. I wove rusted wire, including various rusty bits and pieces as I went along. Rusted some cotton heavy duty thread to attach the weavings to the quilt. The piece is 10" X 20".
 
JUNK  JUNKIE

JUNK  JUNKIE - detail

I have to say this was a very interesting quilt to make. Metal weaving is a bit more of a challenge than I had anticipated but I do have to say...it was worth it!!

Friday, April 15, 2011

Fig Number Four

Here is the photo of number 4 in the Fig Study series.  The title is Dried Figs. I finished it this far some weeks ago. Not sure exactly where it is going but I know it needs something else.  Just haven't been inspired by it as yet.  Some ideas but they didn't look like I wanted.  But, in the meantime, here is Dried Figs. The background of the quiltlet is a handdyed piece. The figs are done in painted and melted Tyvek. The finished piece is 12" X 24".

Dried Figs - the quiltlet


Dried Figs - quiltlet detail


Dried Figs on canvas


The fifth and final in the series is just about completed.  Then on to the next project!!

Thursday, July 8, 2010

Fun Stuff From The Past Month!

FINALLY!!! I am getting to post about all the fun stuff we did when Wil was here! Always a fun time of "playing" in the studio!

First is a pounded fabric piece. (Ahhh the patience needed for this one! Good character building actually I guess)

Then a couple of sunprints. On the purple one I used the plastic rings from milk containers and some river rocks. The picture is actually of the piece all ironed and smooth. The "wrinkles" were made when doing the sunprinting.

This one I used rice and salt. This one is also ironed.

I had never done any splatter painting so one day we took the paints and fabric outside to play. We had picked up a tile covered little breakfast type table for free on the side of the road just up the street. It was PERFECT for these projects because we didn't care if it got paint on it or got left out in the rain. These were lots of fun and I really like the results.


Next we did some ice cube dyeing. We used some dye that I had still in leftover from a previous project. All mixed with water but no soda ash. Thought it would be interesting to see how much "oomph" it still had. Not too bad really!! Especially considering some of it had been quite diluted for the original dyeing session. Another patience builder but this on is only overnight! The fun of it is that when the dye is frozen in the ice cube trays you can't tell what colors are in which cube! Always a surprise! I love that!
Then I wanted to do some more breakdown printing. (I must have a need to build patience come to think of it....this one requires waiting 3 days or so for the thickened dye to dry on the screen! No instant gratification there!) These started out as red and purple I think...but ended up a bit more on the red side actually. A bit too much on the red/pink side for my taste but they are so beautiful and textured I know they will be awesome either overdyed or as a background for some other technique! I just love the urban-ness of them. Totally different from my love of outdoors and nature. Funny how that works, huh? I am posting them below in order of the printings I did. The first one is the lightest because not that much of the dried thickened dye comes off in the first pass. They get progressively darker.


I've been busy this month getting some things ready to sell (at least hopefully sell!) So, now...back to the "grindstone"!!