Showing posts with label fiber. Show all posts

Thursday, March 21, 2013

More News!!

Received an e-mail this morning that my piece, "The Sapling" was accepted for Art on Main in Zumbrota, MN!!  The original art work had to be 12" X 22". Then, when accepted, it will be photographed and blown up to 24" X 44" vertical for banners to be placed on the lamp posts on Main Street in Zumbrota, MN!!

This is my first acceptance for Public Art!!

This is a very special piece for me. It became a kind of test/inspirational piece for my upcoming series "Pecans" that I'm doing in honor of my dad...who LOVED pecans and had planted his own orchard.  When he passed away, his ashes were buried under a HUGE pecan tree in what used to be their front yard.  While there for his memorial service, I took (with permission of the new owner) several twigs from that HUGE pecan tree and had thermofax screens made from them. Those are the screens I used for printing the "branches" for The Sapling.  The "trunk" is made from bark cloth from Africa (Thanks, Wil!!), a place my parents still held dear in their hearts after living there for a while.

So, Dad, this one is for you.....

Here is the piece that will be on Main Street -

THE  SAPLING

All fabrics are my own hand-dyed and surfaced designed fabrics. (except for the painted silk in the ground. That was a gift from a friend Canada. Thanks, Maggie!) The dark brown strip through the ground is hand-dyed yarn from a company run by my neice, Faith, and her business partner, TactileDactyl Fiber Art. Be sure to check them out!! Their yarn is luscious! And yes...those are real pebbles.

Saturday, September 8, 2012

Creativity - Week 1

One of the goals I've set for myself recently, is to do one thing every week that I either haven't done at all before...or...a twist or tweak on something I'm familiar with.  So yesterday I did some stamping with a dried onion. This is something that Wil did on her visit here but I was doing something else that day and didn't get to play.  So now it is my turn.

I cut the onion in half and let it dry for quite a while...days and days. The background is a piece of my own hand dyed fabric. I stamped with Jaquard Lumiere Metallic Olive Green. I love the effect! Not sure if I'm going to add to it or not. Just living with this for a bit to see if it is fine as is or needs something else.


Then when I was finished with that piece, I had a bit of paint left so I grabbed another bit of my hand dyed fabric and wadded it up then rollered the paint over it.  Repeated this several times until I got the coverage I wanted.


Also made a print of the onion on paper. Thinking I might want to make a screen print of it soon.

Saturday, April 2, 2011

Third in the Fig Study series

Went a bit smaller for this little quiltlet.  The finished size of this piece on canvas is only 14" X 11".  The title is Three Little Figs.  Even though there is now a fourth fig, the emphasis is on the three together so I'm keeping the name of the original quiltlet.

And this time I actually got photos of each stage of the process!  YEAH! Although the ones of the painted piece are a bit shiny....the background very closely matches the quiltlet color as seen in the first photo. ENJOY!!

The beginning quiltlet

The quiltlet stitched onto the canvas

Background painted

Three Little Figs completed

Three Little Figs detail
I used a purple ink on the border of the painted fig to copy the stitching around the quiltlet ones and green ink to give some shading to the quiltlet figs.

I already have the first three stages completed on the next piece so hopefully will have that one posted the first of the coming week! So stay tuned!

Thursday, March 24, 2011

Second in the Fig Study series

I know...I said I would take photos of the process this time.  I just have so much fun I forget.  Third times the charm???? I have the canvas now for the third in the series.  I'll try to do better with the camera this time.

This second piece is called Figs of Gold.  The background is hand dyed fabric, the figs painted with metallic paint.  The shading is pen and ink. And here it is!

Figs of Gold - the quiltlet

Figs of Gold - stitched on canvas


Figs of Gold - Completed


Figs of Gold - Detail 1


Figs of Gold - Detail 2
(This one looks a bit different because I had to turn off the flash. The reflection was wiping out the details. I wanted to carry through the stitching around each fig so the ones on the canvas are "stitched" around with pen and ink.)


Now...onto the third in the series!!!  Here's hoping I remember the photos this time!

Friday, March 18, 2011

Back now - Hopefully!!

Yep dark days....survived to tell about it. THEN I get sick....yes....AGAIN!!  But now I'm back for what I hope is a good long time!!!
Time has not be totally wasted however. I've started on a new project that I am quite pleased with.  I was inspired by a couple of techniques a friend shared with me.  I modified them a bit, combined them and found that I really like the results.  The origianl idea is to use this technique for my individual manhole cover projects but I wanted to try it out first to see if it would turn out like I envisioned.  So, I had a series of little quiltlets that I had done for a class. Why not try it out with those and see what happened???

So here is my Fig Study series as I begin to complete them with these techniques. I was so excited and having so much fun that I didn't take photos of each step (drat!!) on the first one but I'm trying to do that on the second one. I do have one confession.....it was difficult making that first brush stroke with the paint onto the fabric!  But I'm glad I did!

First is the branch with little figs growing on it. It startes with the original quiltlet.

Fig - Branch (quiltlet)

Then I stitched it to the canvas (didn't get this photo).  Next I mixed acrylic paints to get the color I wanted and then painted the canvas.  Also extended the branch and the tip of the leaf. (I did later adjust the color on the leaf tip....looks much better later on.)

Fig - Branch (stitched on painted canvas)


Next I painted with acrylics to add an additional branch and leaves.  All branches and leaves wrap around the canvas on the sides as well.

Fig - Branch (completed)


One last step.  I added shading with pen and ink on the fabric as well as the painted leaves and branches. Just making little dots with the pen and ink. Here are a few detailed photos.

Fig - Branch (details of pen and ink shading)


So, that's what I've been up to lately. I just stitched the next quiltlet onto canvas and when that one is completed I'll post the photos of the steps on that one.

Sunday, January 2, 2011

HAPPY NEW YEAR!!!

Yep! Here it is.....2011!!!  As you can see, the holidays knocked a big whole in my schedule plans but I'm not back in the studio and will try to catch up somewhat with posting here.

First thing I want to do is show you the stories I wrote to go with the canal houses.  Here are the first four houses.  The stories are below the photo which are left to right A B C & D. Please keep in mind that many of the embellishments were sent along with the individual house so some of the story references revolve around those embellishments which will be added on by the recipient.


Three Generation Family Home (aka House A)


This is the residence of a large family. Currently there are three generations living here together…the grandparents, parents, and seven children (three of which are under 4 years of age!). It is a happy home, even if somewhat chaotic and noisy at times. There is an artist studio at the back of the house that looks out onto the back courtyard. The grandmother spends almost all her days out there. But sometimes, she invites in a grandchild or two to begin to teach them the joys of art. At least one of them shows great promise of talent even at the age of three! The 10 year old doesn’t visit as often but has artist talent all his own! The room in the attic is very special. It is the guest room for visiting artist friends!! Every morning the kitchen smells of freshly brewed coffee and on the porch you can hear the murmur of friendly conversation and watch the cardinal on its daily visit.

Home of the Chief Judge of the Kennel Club (aka House B)


While Chief Judge sounds ominous and intimidating, this judge is very friendly and approachable. Especially when he is on one of his twice daily walks with his own lovable dog. In fact, you might even say this is the Dog’s Home as almost everything in this house is doggie friendly. The morning newspaper is left by the front door for him to retrieve and a bone has been known to be buried at various times in the flowers under the windows. He’s a very friendly dog, too, so be careful when walking by dressed in your fancy clothes. He WILL jump up and give you a big lick! But only if his master is not around. All in all though, he is a well-behaved and beautiful dog. So, walk along with them sometime and hear all the amazing stories of the Kennel Club annual competition!

Residence of the President of the Yacht Club (aka House C)


Yes, he only has a small skiff on the canal but at port he owns a fairly large ocean-going yacht! He loves all things nautical or having to do with water and boats. Even the window treatments are the color of a lagoon and have waves stitched into them. And his weather vane is a canoe. He so loves being as close to the water as he can, that he has his study on the basement level with a window practically at water level! The red and gold color of his home remind him of the brilliant sunrises out on the open sea – ushering in yet another wonderful day of sailing. The sky over his home even takes on a wavy look just for his pleasure. Next time he’s pulling out into the canal, if you ask nicely, he’ll probably be more than happy to take you out on the water with him!

The Bakery (aka House D)


While some claim that the Pancake Bakery is the best….we know better! Wil’s Bakery on the Canal tops them all! AND they serve delicious Starbucks coffee! Now what could be better than a cream cheese croissant and a Pumpkin Spice Latte! There are tables inside so go on in, grab a newspaper and your yummy treats and spend a leisure morning. Sometimes it is difficult to concentrate on one thing because ALL your friends seem to pop in while you are there. But that is a joy in itself. Coffee, croissant and friends…well, that’s just about as close to heaven as one can get! One group that meets here on a regular basis is the artist ladies! Wil is one of them and they meet here because she lives upstairs. (You can tell because her sewing machine is by the window.)They’ve been know to spend an hour or two here before they head off on shopping sprees to buy the latest art tool! They aren’t around every day because their trips usually have to take them to the US!! But…they will be back before you know it! So, enjoy your baked treats and Starbucks lattes and keep an eye out for them!

I'll post the next three houses and their stories tomorrow!

Thursday, March 25, 2010

Thread Lace and an ATCs

First off.........I've just completed the April ATCs for the Birthday Swap. Since April is "Financial Literacy Month", I chose a money theme. The title of the ATC is "If Money Grew on Trees" It took me a little while to get inspired for April but when I found a stash of very tiny old foreign coins it all fell into place. The background is a commercial fabric of abstract trees. Then I added the coins and some organza with little shiny bits on it to put in the trees. The "ground" is some bits I had left over from another project with dyed fabric and scrim.

If Money Grew on Trees
In another group, we are working on several embellishing projects. Our current one is thread lace. I'd never done it before so I went in search of the supplies needed and actually found them. That's amazing because these are not things I use often. The first is water soluble stabilizer and the second is my embroidery hoop! I was supposed to start with some kind of grid...but well.....I'm not a grid kind of person really. So I skipped ahead and just did a free-hand tree! It didn't take very long and it was a lot of fun! When I was finished, I just cut out the area with the tree and soaked it in water for about 10 seconds and here it is! Oh and YES....I'll definitely be doing this again!! The brain is imagining all kinds of things I can make this way! The picture below is the lacy tree on a piece of muslin. It is not attached at all, just for a plain background.


Tuesday, January 12, 2010

Still on Schedule!

OK, right on schedule so far! A slight delay due to helping put away groceries. It's always something I guess. But, in the true spirit of learning to dance in the rain......I'm thankful we have food to eat!!!

Snow dyes washed and dried and ironed - here they are!! I had forgotten how wonderful snow dyes can be.

I love the separation of color and the shades of those colors. I used a mix of a blue and yellow to get the green I wanted. I LOVE this piece!!

However, this is the one that won the audition for the quilt backing. This is one of the pieces which got squirted with green, blue and dry bronze
This is the other green,blue,bronze pieces. Unfortunately, it is my little mutant piece. While drying, it slipped off the drying rod and fell into a couple of the drip pools from the other pieces. So, it has a couple of blemishes. Poor baby. However, there are still several beautiful parts left and who know but what I might need a piece just like this one for something someday. So, mutant though it is.....it still has a loving home here with me.


This is the all purple piece. Notice the separation of the red and blue I used to make up this particular purple. I LOVE when that happens!!!


These are the two pieces with purple and red. I love these, too!! Just like a mother with her children, huh???


I had a remaining FQ in the SA soaking, and still plenty of snow to take advantage of so I made another piece over lunch. It is currently still melting.

So, to complete todays goals, I have to get busy and stencil to see how that will work out and do the window on the quilt.

Sunday, June 7, 2009

New Journal - The Artist's Way

I just completed another journal writing my daily pages (well.........there was a bit of a "vacation" so it wasn't exactly EVERY day). Time to make another one!!

I had so much fun with the acrylic spackling on New Beginnings challenge that I wanted to try it a different way this time. I started with a piece of my own stamped fabric of butterflies (seems appropriate for spring/summer) and then added some sequine waste in white diagonally across the cover. Then I spread a space of acrylic spackling over it and embedded some butterfly charms. Then I embedded a few pieces of the decorative yarns which I used on the spine just for some more texture and interest. Before it all dried I spattered some Cranberry Red Dyna-Flow over the spackling with a toothbrush.
Now, in the morning, I'm ready to start the next part of my life's adventure in writing my pages!

Saturday, May 9, 2009

More Alphabet

Another day in the studio.........awesome!!! It's been a while and I have truly missed it! Today I continued on with some of my alphabet challenge.....E - G.


The Letter E
I have used the machine embroidery stitches on several projects from the past years. I felt it was appropriate for the letter E. I used a light blue thread for this piece.


The Letter F
One of my favorite techniques. Foiling. I used the iridescent foil because it has some opalessence of purple and blues in it.


The Letter G
This is a Glittered chiffon I have used on several other projects and had a couple of little bits left over. I had interfacing behind the black fabric and placed the letter template over the glittered chiffon and stitched it with a very small stitch. Tore off the paper and trimmed the letter.


This is getting addicting!!!!! Oh well, at least it only has 26 letters in all so I'll have to quit at that point!

Friday, May 8, 2009

Alphabet Challenge

A friend issued me a challenge she is participating in with one of her groups. While I'm not in the group, it was something that sounded like fun to do together. No deadlines (for me anyway!)

The concept - Make a piece for each letter of the alphabet. The technique, tool, or fabric should represent the letter of the alphabet. For example - The letter A - Angelina. You'll see as I go along just how it works. I have a list already for many of the letters but I have left some for later inspiration! (Translation: I have no idea yet what to use for them!)
I searched the internet and chose a Celtic version for my alphabet. So, with no further ado........Let's begin! (Strains of "Let's start at the very beginning. That's a very good place to start" just ran through my head!) I am aiming to use shades of blue, purple and periwinkle...unless the technique or whatever doesn't lend itself to that. The background will be black. I'm going for a medium-high contrast.

The Letter A

This is several layers of a pearl periwinkle angelina. Then I cut out the letter A and stitched it to the fabric.


The Letter B
A couple of years ago in a Michael's clearance bin I found several jars of seed beads mixed with white glue. You spread the mixture onto a surface and when the glue dries clear all you have showing are the beads. I first used the Crystal white beads and then some Violet beads to keep with the color scheme.


The Letter C
I used Jacquard Dyna-Flow paints to tint the cheesecloth a periwinkle color. Then I folded it several times and with interfacing on the back of the black fabric I placed a copy of the letter on top of the folded cheesecloth and stitched it down. Then tore away the paper and trimmed the cheesecloth.


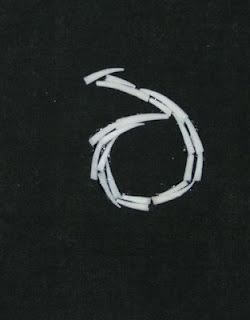
The Letter D


At a group retreat in Montana, my friend and I were finding several interesting items on E-Bay. One of these items was dentalium shells....so named I'm sure because they look like small very pointy teeth! I attached them to the black fabric with E-6000.


That's it so far. Now on to the rest of the alphabet!!