Thursday, October 4, 2012

The Finished Piece

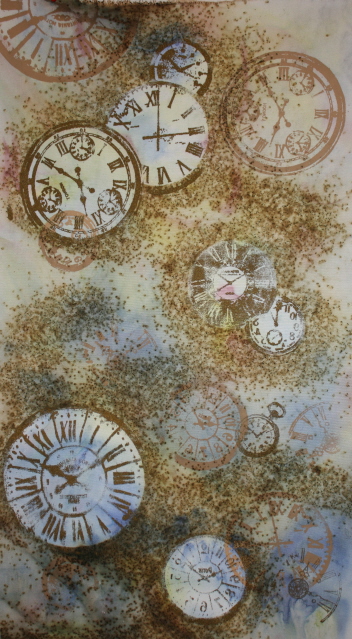
Just completed it....binding, sleeve and all.  Even added some real watch parts.

The Sands of Time
10" X 20"


Wednesday, October 3, 2012

Burned For a Purpose

This saga began almost a year and a half ago.  We were visiting NE Minneapolis art district for the annual Art-A-Whirl.  Some amazing art caught our eye.  Very ethereal....haunting almost.  Imprints of leaves mostly.  Breath-taking.  We asked the artist how she achieved this beautiful effect.  The answer....gun powder.  What????  Yep...gun powder. The prints she produced stayed with us all day.  As textile artists....and risk-takers in general....our natural inclination was...."I wonder what would happen if we did it on textiles?"  We didn't get to it that summer....but this summer we HAD to try it out.  We gathered our supplies.  Bought the gunpowder (I'm always amused by people's reaction.  These two women asking the clerk where to find gun powder. "What kind do you need?"  ummmmmm we don't know.  We are artist and are using it in our art.  "Ahhhhh"  - like that explains everything!!  Too funny!)  So anyway, after we found out that we for sure didn't want the kind that exploded....just burned, we were on our way.

We got one or two good pieces out of it....well, my friend did anyway.  We worked with the leaves...it was a windy day....enough said.

I've been so wanting to try it out myself and just waiting for a project that could benefit from this technique.  Then I had it. The 10 X 20 group - I still have 2 pieces to complete for this year.  One was due Oct. 1 so yes....I'm a bit behind.  The difficulty wasn't the gun powder bit....but finding an appropriate background.  Finally I found a piece of what felt like a twill.  Liked the subtle dyeing that had already been done to it. Only one problem....didn't think about what the fabric make-up was.  I mean I hardly have any textiles in my studio that aren't cotton or silk or linen.  So I go merrily on my way to experiment.  POOF!  The gun powder went off and the cardboard on top was burning a bit around the edges still....not uncommon.  I picked the cover up and the fabric itself was burning and melting.  Can you say synthetic fibers???? Put it out right away so no horrible damage was done.  But....as they say....you learn something new every day. 

Still...I got the results that worked for this particular project. There will be additonal experiments - on cotton - but I'm happy with the results for this time.  Below are photos of the process along the way and the final results, of course.

Screen printed clocks in Latte acrylic and ironed on the masks of freezer paper

Taped the fabric to the board and applied the gun powder

Set the gun powder on fire (and the fabric as it turned out)

Resulting fabric with masks removed (you can see the burned edges)

Another layer of screen printed clocks, this time in Lumiere Old Brass - and a few stamped clocks as well

Now to do the stitching.....and probably adding a few watch parts as well.  Hope to have it done by Monday if not before.


Monday, October 1, 2012

Weekly Creativity - Week 4 - Confetti Dyeing

Ok, you just gotta try something that says "confetti" right? This is just one of the options for this process.

My original purpose was to obtain a background for a new art piece I'm working on.  Alas....neither of these new fabrics will work.  On to plan B for that project.

Stil...I do love the fabrics and KNOW they will find their way into my art and probably soon.

Here's the process

Soak fabric in soda ash
Place wet fabric in a flat container (so you can spread it out but it doesn't need to be totally flat)
Sprinkle dry dye powder onto the fabric (I used a mesh tea ball for this and it worked really well! still..it takes a light hand)
Scrunch the fabric up a bit more
Spray with a mix of water and soda ash (I just used liquid from the water/soda ash which I soaked the fabric in)
Let it batch for a few hours at least
Rinse, wash, dry, iron

And here are the results:
Confetti Dyeing - 1
This piece of fabric I left at the full 40" long

Confetti Dyeing - 1 - detail

This piece was way to dark so I thought I could try for a bit lighter the next time. Used a good bit less dye powder
Unfortunately, it is still too dark for what I need.  But, especially in the detail shot, you can tell why it is called "confetti" dyeing! The dye powders do separate into their component colors

Confetti Dyeing - 2

Confetti Dyeing - 2 - detail

I used white cotton PFD, Dyes (Ecru, Straw, Hollandaise, Bronze and Pewter)

Friday, September 28, 2012

The Long Road Home

After my original idea for this challenge for one of the internet groups grew to 20 X 20, I had to come up with a new idea in that theme.

This month my husband and I did a whirl-wind trip to Texas. Driving straight through there (1,100 miles one way) and straight through back (another 1,100 miles). The reason - my dad's memorial service. All this in 5 days. So Road Map was an appropriate theme for me this month. And due to this long road trip to my home state, to my parents land where my dad's ashes are now buried, I've chosen to title this piece:


The Long Road Home


So, I went quite literal this time. White cotton background (just like a real map) The roads, county lines, road numbers, railroads, rivers, etc are stitched. I then painted in the colors of the different roads and the river with Pigma Brush Pens.


Saturday, September 22, 2012

Weekly Creativity - Week 3 - Sugar Resist

This week I tried a new resist technique I had read about on another blog (And Then We Set It On Fire). I've done resists with commercial products, flour, even baby cereal...but never sugar! So I just had to give it a try.

While the main emphasis was on sugar syrup that one makes with granulated sugar and water boiled, etc. I had limited time so I just found the other sugars mentioned by someone else on another post....pancake syrup, molasses, and corn syrup. Sounded like enough to give the technique a try and see what happens...and here are the steps and the results.

First I set everything out - vinyl work cloth, palatte for resist, fabric, resist printing tools, syrups, and Jaquard Dyna-Flow paints (on the original tutorial - thickened dyes were used but again - time constraints won the day)


All Set to Start

Then I applied the resists
Pancake Syrup / Computer part

Molasses / Commercial Stamp and Punchinella

Corn Syrup / Squiggly Straw and tray from package of glue sticks

Jaquard Dyna-Flow paints were applied with syringes. I used Violet, Periwinkle and Midnight Blue on all the pieces.

Pancake Syrup

Molasses

Corn Syrup


And here are the results
Pancake syrup

Molasses

Corn Syrup

So in the end, when I had hung the pieces up to dry, I had a very interesting design of paint left behind on the vinyl work cloth.  I decided to use it for a monoprint. My bonus piece from this technique experiment!

Bonus Monoprint

I really like the results from this technique. So much so that I'm sure I will give it a try sometime soon using the thickened dyes and maybe even make the sugar syrup!

Wednesday, September 19, 2012

And it grew and grew!!

This is the quilt top made from the map fabric I made last week.  It was supposed to be for a 12 X 12 art quilt but I was having so much fun adding in the fields, etc. that it grew to what is now going to be a 20 X 20 quilt!! This is just the top. It still has to be quilted and bound. It doesn't fit the size for any group quilt requirements I'm currently working on so I guess this one will just be in my collection!

And it came to mean a lot more to me after driving round trip to Texas in 4 days!! Maps maps maps.

Now, can you see the fun things I put in here?? 

A vineyard which backs onto a dirt road. (purple on lower left)

A forest just right of center on the bottom

A marsh near the upper left top (kind of a mottled green)

Two plowed fields (left edge just top of center and bottom right quadrant)

A corn field just up and left of center above the little pond in the center of the map

Two green fields - probably soy beans

A brown field which is fallow dirt this year

And finally, a golden field - waves of grain no doubt!

Oh and the river, of course

TAKING THE BACKROADS

I named it Taking The Backroads because whether it is on a photo safari or on motorcycles...I LOVE the backroads!!

Besides the map fabric I made, I used my own hand dyed fabrics, rusted, rouched nad painted fabrics. Only commercial fabrics used were for the roads (both asphalt and dirt). I chose them because they look like....well...asphalt and a rutted dirt road. Here is a detail photo so you can see what I mean.


I had a blast making this top. Of course, now I have to come up with another idea for the 12 X 12 challenge this was meant to be!

Tuesday, September 11, 2012

Weekly Creativity - Week 2 - WonderUnder Image Transfer

The 12 X 12 group that I participate in has a new theme for September - Road Map.  So I figured I would work with actual road maps! Hey, why not! I had seen this method of transferring images to sheer fabric and wanted to give it a try. So I'm doing something for my Weekly Creativity Goal and at the same time accomplishing an art quilt for the September Road Map Challenge Theme! MULTITASKING!!!

I happen to LOVE maps so I collect them from all kinds of publications. Glad now to have such a diversity. I picked out my favorites and arranged them to the size I need. It is larger than a 12 X 12 because I will need that extra for the technique I'm going to use in Step 2.


Then I covered it with a sheer silk. No idea what kind of silk it is...just found it in my stash and checked to be sure I could see through it.  First I ironed WonderUnder onto the maps, peeled off the paper and put the silk down onto the top covered in WonderUnder and ironed to down.


Next step is the big messy part. I turned the piece silk side down and thoroughly wet the back side of all the maps. Then the labor intensive process of carefully peeling the backs off the paper so only the images remained on the silk.


A final rinse to remove all the tiny tiny bits of paper still clinging to the back, and hung it up to dry overnight.


This morning, it is dry and while a bit more opaque than I had preferred, you can still see the maps through the silk. Hopefully this afternoon I'll get started on the next step of this art quilt!!  Got ya curious???