Friday, April 22, 2011

Personal Journal Page

Found this wonderful picture of fossilized ferns and weathered stones and it inspired this journal page.  I'm fascinated with old things....the older and more worn the better.  I have TONS of photos of falling down buildings and old doors and windows...just to name a few.  I think I love them because each of them has a story to tell.  I try to listen and tell that story from my own perspective. 

FOSSIL - a journal page


Saturday, April 16, 2011

Some Journal Pages

Took some play time today to work on some journal pages. And no.....my studio is not clean/organized yet....and the prospects are looking pretty bleak.  No sooner do I get a space cleared off and I find some fun thing to do which messes it all up again.  Maybe now that I have at least a path to all the important places in my studio I should call it done!

One of the groups I play in had a list of prompts for this week.  Three of them fell into place almost right away.....Night/Day, Song, Lyrics.  The main sheet music is of the song Night and Day.  The background goes from Midnight Blue to Sky Mist. The songs titles on the left side have to do with NIGHT....We're Tenting Tonight, It Came Upon the Midnight Clear and Silent Night.  On the right side are all the song titles that have to do with DAY....Morning Comes Early, O Happy Day and Some Day.  Most of the music is from a lot of very old music I got from my mother-in-laws piano bench. Then I chose to journal in the spaces of the Night and Day sheet music.


This one started out because I wanted to try out the Peeling Paint technique (oh and do I ever love it!!). I liked the time-worn aspect of it. And I happened to have stamped watches in the background of it. So, as I'm scurrying around trying to get so many things done before a friend comes to visit, and so many other things that seem to have looming deadlines, I decided Time Flies was an appropriate title and theme for this page. 


Friday, April 15, 2011

Fig Number Four

Here is the photo of number 4 in the Fig Study series.  The title is Dried Figs. I finished it this far some weeks ago. Not sure exactly where it is going but I know it needs something else.  Just haven't been inspired by it as yet.  Some ideas but they didn't look like I wanted.  But, in the meantime, here is Dried Figs. The background of the quiltlet is a handdyed piece. The figs are done in painted and melted Tyvek. The finished piece is 12" X 24".

Dried Figs - the quiltlet


Dried Figs - quiltlet detail


Dried Figs on canvas


The fifth and final in the series is just about completed.  Then on to the next project!!

Where IS Spring anyway?????

Tired of the frozen tundra......more snow forecast for tomorrow (saturday). I'm a true snow lover but even I'M done with it already!

So, I did a page in my Windows and Doors Journal this morning.  Just trying to keep my thoughts to the spring that will surely eventually arrive.

Thursday, April 14, 2011

New Direction

Any of you familiar with the writing aspect of the Artist's Way?  I've enjoyed that for several years but have found that lately it has been less rewarding.  Now I think I know why.

I have several kinds of art journals that I work on.  Most have been more recording the work I'm doing or I have an Inspiration Journal with snippets of things that inspire me. But this winter I was involved in, what was for me, a new adventure.  Just free-wheeling journaling. Well, there was a BIT of structure in that there were prompts. But where I took it from there was totally up to me.  One particular journal was more one of self-discovery.  And here is what I learned from that.  I so much prefer expressing myself visually than in writing (although, there was writing involved on most of the pages - it wasn't the main part. More of an extension of the visual). I found that I learned so much about my view of the world and my art than I have in several years of writing journals. 

So, while I'm not giving up on writing in what used to be my daily journal (which is now more my sporadic journal), my main emphasis these days is art journaling. This current journal records my thoughts and just whatever happens that morning. Some pages I might complete in my journaling time in the morning (about an hour) but if it extends to the next day, or even days, that is just fine with me.

I don't plan to post any of these pages as they are more for my own reflection.....but you never know.  That might change if there is something I think worth sharing. I'm really looking forward to this particular new slant of my journaling journey.

Monday, April 11, 2011

Back to FACES Journal

At long last (and now that I had some pages ready to work on) I came back to work on my Faces Journal. 

To begin, I had done page 3 months ago and just never posted it so that will be the first photo for today.  I had decided that I didn't want to take classes or anything to learn to draw faces....just planned on a lot of trial and error.  OK....you can quit laughing now! It made sense at the time.  So here are a few examples from various drawing instructions that I planned NOT to use!  Don't worry....I moved on from there.

Faces Journal - page 3

Then somewhere I found this free series on How To Draw Faces. It made it all look so easy I decided it just MIGHT be worth looking at. Keep in mind this is not an exhaustive study but rather a beginning place. Which is just where I am.  The first lesson was on how to draw eyes. So, that is where I began my journey as a student.

One more caveat - I practice in my sketchbook to learn to get better and better.  This journal is just to chronicle my journey....NOT to be a place to draw perfect eyes. So, don't judge my efforts by the drawings in this journal. I read a quote from a mixed media artist in the CPS newsletter just this morning.

“Journal style drawing is meant to be fresh and casual. It's meant to capture a specific time—you do it and then turn the page.” Jane LaFazio

That is where I'm at currently. So here are pages 4 and 5 on Eyes - fresh and casual

Faces Journal - pages 4 and 5

Faces Journal - pages 4 and 5 - details


So...am I on a roll again?  We'll see.  I do have pages 6 and 7 prepped so who knows when the muse will strike!

Sunday, April 10, 2011

It's Working!!

Found a new gadget that I wanted to put on my blog called - Follow by E-Mail.  You can type your e-mail in the box and click submit.(look just over to the right side bar  >>>>>this way>>>>>) Then, whenever I post a new item on my blog, you will get an e-mail to let you know!  No post - no e-mail.  Hope you will take advantage of this option.  I'm afraid when I don't post every day you might forget about me!!!  (heaven forbid!!)  So, this way, you won't miss one exciting piece of the adventure! Thanks for joining me on the journey!

Saturday, April 9, 2011

My Altered Book Journey

I've never done an altered book before but wanted to give it a try. A friend sent me some ideas and I decided that it would be a new avenue of art to explore.  So I'll be posting the steps of this journey as they happen.  Sometimes there might be a bit of time in between because I'm still doing other things as well (and it will take DAYS if not weeks to get all the pages gessoed!!!!.....is that a word???) So....that being said....let's start the journey!

You know they say that each journey of a million miles begins with the first step.  Seems like a logical place to start then. BTW, this is not meant to be a tutorial by any means.....I'm just recording the fun I'm having on this new adventure.

Step One

Well, first I had to choosea book.  All of us in our house are book fanatics so I knew it would be difficult to find a book I would be willing to "alter"!!  Certainly I could find a boring book in my husbands study but I'm thinking that would not be a smart move!  So....I found a hard cover book I had purchased at a garage sale some years ago and never used.  It is a hardcover cookbook called "The International Cook".  I love it because it is a tall, thinner book and besides recipes it also has history and descriptions and glossaries of countries and the foods of that country.  There are also some very interesting pictures to highlight!

Step Two

Deciding on which pages to combine to create thicker, sturdier "pages" was not as easy as it sounds. I did lose some lovely picures just because I couldn't combine then any other way.  But I still have enough to work with.  I got out my trusty glue stick and went to work gluing pages together.

Step Three

Now to take the "new pages" and stitch the edges of them to be sure they stay together.  About this time I'm wishing I had stuck more pages together!!  Oh well, I'm on NO DEADLINE so I'm doing it as it stands and just enjoying the process....

Interesting Recipe Pages
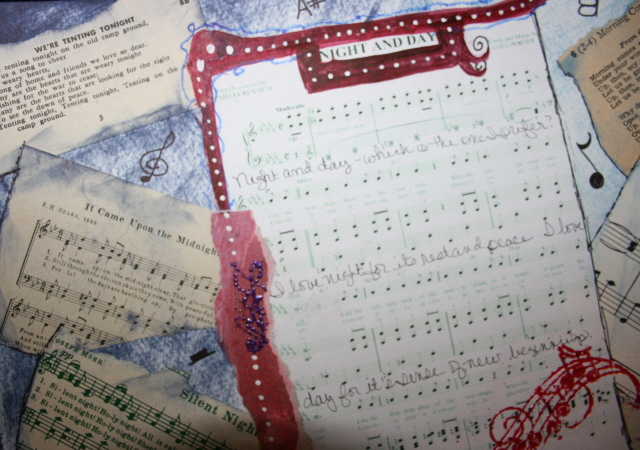
  Other Pages with Beautiful Pictures

Step Four

The next thing to do is to take all those glossy pages and smear gesso all over them so they can be altered with wet applications if desired.  Oh and they WILL be!!  Paints, watercolors, etc.  So many ideas and with the gesso I have all options open to me.  However, for those of us with very little patience....now I'm REALLY wishing I didn't have so many pages (haven't actually counted them yet.....probably ignorance is bliss???)  It doesn't take long to get the gesso on...it's the waiting for it to dry before I can do another page! But I've started now and will just go with the flow.  However, due to drying times.....you won't see the next step posted for about a week or so....unless I get out the heat gun out of frustration and lack of patience!  LOL!!

Adding Gesso to Pages - Highlighting Some Interesting Text

So, unil next time (whenever that may be) I'll be watching gesso dry........

Saturday, April 2, 2011

Third in the Fig Study series

Went a bit smaller for this little quiltlet.  The finished size of this piece on canvas is only 14" X 11".  The title is Three Little Figs.  Even though there is now a fourth fig, the emphasis is on the three together so I'm keeping the name of the original quiltlet.

And this time I actually got photos of each stage of the process!  YEAH! Although the ones of the painted piece are a bit shiny....the background very closely matches the quiltlet color as seen in the first photo. ENJOY!!

The beginning quiltlet

The quiltlet stitched onto the canvas

Background painted

Three Little Figs completed

Three Little Figs detail
I used a purple ink on the border of the painted fig to copy the stitching around the quiltlet ones and green ink to give some shading to the quiltlet figs.

I already have the first three stages completed on the next piece so hopefully will have that one posted the first of the coming week! So stay tuned!