Thursday, October 18, 2012

Weekly Creativity - Week 6 - Large Screen Prints

While I have a "regular" sized screen for printing, I was excited when I read somewhere about how to make large screens...especially for more organic forms.  I so wish I could remember where I saw it so I could give credit to the person from whom I learned this technique.  If you know...please post it in Comments below!

The "screen" is made from organza taped at the edges.  Lesson for next time:  It is pretty much a two people job...at least for me it would have helped to have an extra pair of hands!  The organza shifted at a breath and the duck tape has a very permanent stickiness!!  But I kept on and finally got a fairly workable screen.

The completed "screen"

I then got out my Golden Matte Medium to spread in a rather haphazard manner onto the screen.  I put it all on top of some packing paper so I could just throw that away when it was done.  Lesson for next time: Don't even TRY to use a plastic spoon!  The sturdy wooden one worked MUCH better.

The medium

With the gel medium spread onto the organza screen, it needed to dry very well. I hung it up to dry overnight.

Drying the screen

When it was very very dry, the medium is quite sturdy...at least so far.  I used the duck tape again to lace a spare piece of  fabric down onto my painting surface. It needs to be very stable I think.  The first printing was made with light blue acrylic paint applied with a squeegie thingie.  Lesson for next time: It does take a good bit of acrylic to cover this size.  I had to get out another small bottle. 

First painted layer print

I then removed the screen to see just how the printing went.

Screen removed

Mainly because I used acrylic paints, the screen had to be rinsed right away. I just filled my sink enough to cover it and soaked it for a minute, then used the sink sprayer to get all the paint off.

Screen Rinsing

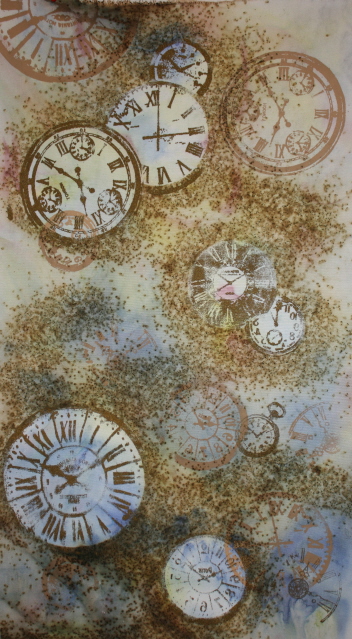
I then repeated the printing process with two different colors of green.  I rather like the effect.....kind of like peeling paint.  I especially like the part over the clocks.  

Printing completed with second layer of two greens

Clock detail

And the screen is very much usable again! I'm not sure how many times it will last but it has already been worth the effort.  Now I want to try making a large screen like this but use a more regular pattern or form stamped with the gel medium.  

Thursday, October 11, 2012

When Inspiration Hits!

The latest challenge for the 12 X 12 pieces is the theme - OPPOSITES. You might think that would be an easy one, right? Perhaps so. However, I struggled with it for weeks now and was just not coming up with something that excited me.


Until today. At my wit's end, I decided to google OPPOSITES just to see what might show up....maybe an idea to work from...or maybe even inspiration! One of the first selections was a list of opposites. Well....that sounded promising!! And sure enough, the light dawned, birds sang, euphoria filled the studio!!!

I decided to use a few of the opposites in one art piece!! Well....when I started looking and thinking, I came up with more than a few.

So here it is...I had a black and white piece I did for a project a couple of years ago. I started with that (the Picasso-esque man and woman in the woven textile background. Then I cut and added the strips for the left side and top.

FOURTEEN OPPOSITES


Yep...you read it correctly!!! There are actually 14 opposites in this one piece. Can you find all of them? I'll get you started....one of them is Black/White. The other 13 are up to you to find. That's why I put it on this post as a large photo. Some of the opposites are perhaps not as easily seen as others. A couple of them are a bit subtle. But they are all visible!! One I ditched (natural/synthetic) because it would not be discernable in a photo.

Good luck! I'll publish the list on November 1 so you can check your list!

Thursday, October 4, 2012

The Finished Piece

Just completed it....binding, sleeve and all.  Even added some real watch parts.

The Sands of Time
10" X 20"


Wednesday, October 3, 2012

Burned For a Purpose

This saga began almost a year and a half ago.  We were visiting NE Minneapolis art district for the annual Art-A-Whirl.  Some amazing art caught our eye.  Very ethereal....haunting almost.  Imprints of leaves mostly.  Breath-taking.  We asked the artist how she achieved this beautiful effect.  The answer....gun powder.  What????  Yep...gun powder. The prints she produced stayed with us all day.  As textile artists....and risk-takers in general....our natural inclination was...."I wonder what would happen if we did it on textiles?"  We didn't get to it that summer....but this summer we HAD to try it out.  We gathered our supplies.  Bought the gunpowder (I'm always amused by people's reaction.  These two women asking the clerk where to find gun powder. "What kind do you need?"  ummmmmm we don't know.  We are artist and are using it in our art.  "Ahhhhh"  - like that explains everything!!  Too funny!)  So anyway, after we found out that we for sure didn't want the kind that exploded....just burned, we were on our way.

We got one or two good pieces out of it....well, my friend did anyway.  We worked with the leaves...it was a windy day....enough said.

I've been so wanting to try it out myself and just waiting for a project that could benefit from this technique.  Then I had it. The 10 X 20 group - I still have 2 pieces to complete for this year.  One was due Oct. 1 so yes....I'm a bit behind.  The difficulty wasn't the gun powder bit....but finding an appropriate background.  Finally I found a piece of what felt like a twill.  Liked the subtle dyeing that had already been done to it. Only one problem....didn't think about what the fabric make-up was.  I mean I hardly have any textiles in my studio that aren't cotton or silk or linen.  So I go merrily on my way to experiment.  POOF!  The gun powder went off and the cardboard on top was burning a bit around the edges still....not uncommon.  I picked the cover up and the fabric itself was burning and melting.  Can you say synthetic fibers???? Put it out right away so no horrible damage was done.  But....as they say....you learn something new every day. 

Still...I got the results that worked for this particular project. There will be additonal experiments - on cotton - but I'm happy with the results for this time.  Below are photos of the process along the way and the final results, of course.

Screen printed clocks in Latte acrylic and ironed on the masks of freezer paper

Taped the fabric to the board and applied the gun powder

Set the gun powder on fire (and the fabric as it turned out)

Resulting fabric with masks removed (you can see the burned edges)

Another layer of screen printed clocks, this time in Lumiere Old Brass - and a few stamped clocks as well

Now to do the stitching.....and probably adding a few watch parts as well.  Hope to have it done by Monday if not before.


Monday, October 1, 2012

Weekly Creativity - Week 4 - Confetti Dyeing

Ok, you just gotta try something that says "confetti" right? This is just one of the options for this process.

My original purpose was to obtain a background for a new art piece I'm working on.  Alas....neither of these new fabrics will work.  On to plan B for that project.

Stil...I do love the fabrics and KNOW they will find their way into my art and probably soon.

Here's the process

Soak fabric in soda ash
Place wet fabric in a flat container (so you can spread it out but it doesn't need to be totally flat)
Sprinkle dry dye powder onto the fabric (I used a mesh tea ball for this and it worked really well! still..it takes a light hand)
Scrunch the fabric up a bit more
Spray with a mix of water and soda ash (I just used liquid from the water/soda ash which I soaked the fabric in)
Let it batch for a few hours at least
Rinse, wash, dry, iron

And here are the results:
Confetti Dyeing - 1
This piece of fabric I left at the full 40" long

Confetti Dyeing - 1 - detail

This piece was way to dark so I thought I could try for a bit lighter the next time. Used a good bit less dye powder
Unfortunately, it is still too dark for what I need.  But, especially in the detail shot, you can tell why it is called "confetti" dyeing! The dye powders do separate into their component colors

Confetti Dyeing - 2

Confetti Dyeing - 2 - detail

I used white cotton PFD, Dyes (Ecru, Straw, Hollandaise, Bronze and Pewter)