Wednesday, December 30, 2009

The Coming Year

Life here is rather in limbo these days so I am currently not signing up for any quilt swaps or challenges (although I plan to complete my Transition one by the end of January). Then I was sent an invitation to join an ATC birthday swap. There are 32 people signed up so that is a good number. I decided that little pieces would be something I could do and still keep my hand in the creative side of my life. There is only one birthday in January. Here is the ATC I made for her.

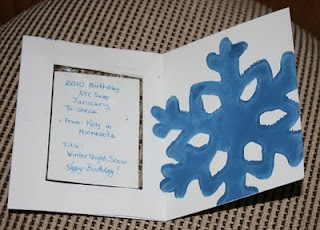
This is the ATC. The name of it is "Winter Night Snow". The background is blue Tyvek melted with a heat gun. Then it is sprayed with silver glitter paint. The snowflakes I had left from an art quilt I did previously called "No Two Alike"


I encased the ATC in between two layers of sheet protector and sealed it with an iron (between two Teflon ironing sheets!) Then I stamped white card stock with blue snowflakes. I folded the card and cut the window out. I glued the sheet protector package to the inside of the card fold, sprayed adhesive on the inside and folded the card. This is designed for the ATC to be removable. This is the front of the card (obviously!)


This is the inside. The writing you see is on the back of the ATC.


Then I made printed a white cardstock page with this snowflake pattern, cut out the envelope form, folded and glued the edges. Then the card was placed in the envelope and it is ready for the mail! I covered the mailing label just so the address would not be posted.


Fractured Flower ready to send

Yep, it's been a while! But finally I've completed the four sections of my part of the Fractured Flower!! These are the four pieces on my design wall. Obviously, the seam allowances make it look a bit wonky but there they are! Whew!! It was a great learning experience. Especially for someone who doesn't like "rules" that much and prefers to just "wing it". But it was worth it in the end. Now, I'm just waiting to get back the four pieces I'll have for making a completed piece. I'll post them when I get them and we'll see what comes of them!


Wednesday, October 21, 2009

Fractured Flower - next steps

Well, FINALLY I'm getting back to my fractured flower project. Got the pieces with the adhesive on the back and then cut out. Started placing them with the placement map and found out is was much more difficult than I had thought it would be! But, we soldier on!!

After just a few pieces are adhered it still doesn't look very promising I must admit. I think this piece was more difficult because the background piece for this quadrant didn't cover the whole picture back.....just the areas for the background of the picture. Also, this is on some light interfacing and for the rest of them I will use a light muslin from the beginning. Anyway, here it is in all its glory!


Got a few more pieces on and I could start seeing how it was all coming together. At least enough to encourage me to continue and not run out of the studio screaming!!!

Perseverance paid off in the end. Haven't put all the "finishing touches" on it yet but I think it is looking like the picture. OK, at least it is recognizable as a flower now!! The size difference I think is partly because of the angle I took the picture and also because the fabric one has the seam allowance added on to it.

Now on to the other pieces!! After finishing one, I did learn a few things I'll do differently on the next one and see if it makes a difference. Mostly it takes some concentration to be sure it is built up from the back. Now that I'm on a roll I'm actually enjoying it.


Saturday, October 10, 2009

Playing with Wil - the final chapter

OK, the final chapter for this visit anyway. Just returned from dropping her off at the airport. But yesterday, after coffee, shopping, shopping, shopping and lunch -- we came to the studio to play some more with the gelatin. This time we took it out of the container and broke it into pieces which we laid on a drop cloth. Then we dabbed paint onto the broken up gelatin pieces and pressed the fabric onto the painted pieces. Another look completely. I especially like the areas where holes had formed in the gelatin.

Here are the three I did:


Now I have to play all alone for a while. (sniff sniff). Hopefully I'll find SOMETHING to do....lol!!

Tuesday, October 6, 2009

Playing with Wil - Part 2

We had so much fun with discharge yesterday we decided to do some more today (after all, we found some new and different clothes pins that were crying out for some experimenting!!) Below is the fan folded Black Kona with the bleach starting to act on it.
This is the completed piece!!
Then I got out all my Twixits and we did some clipping with those and then discharged it.
I liked my knotted piece so much yesterday that I wanted to do a bunch more (I obviously forgot how difficult it was to untie the wet knots!!!) Same bleach, same Kona black and yet SOOOOOOOOO different that the strip I got yesterday. There was something going on that caused us to ask several questions and later today we did a test. I'll let Wil tell you all about that on her blog. Probably tomorrow check it out. Right now we are dead on our feet!!! She has already gone over to the house to take a break before dinner! But here are my strips from today!! Needless to say.....they will be put together in some form to make a quilt!!!
That's it for today, I'm beat and hopefully my husband will remember to bring home dinner!!

Some fun from today's play time

OK, so you have seen my lino cutting of Tallinn. Before I started the "official" piece I made a practice piece just to be sure how to use what tool to get which look. Below I printed the lino cut with brick red paint. Then I used artist chalks to color it. I'm in love with it actually. TONS of fun!!!

Wil and I were shopping yesterday (what else?!) and at the shopping mall we ran across several very interesting plants. Feeling like some sort of covert operation - I "liberated" a few of them and we used them in some more gelatin printing. Below are the ones I made. The left picture is the one with the plant on the painted gelatin and the right ones are from the paint left after taking off the plant.


This is the other drop cloth made from putting the used plants on fabric and with muslin on top of them, I brayered them to print the paint remaining on them.


Now, as long as no one got my liscense number.....we might pick up some more on Friday!!! Plant life everywhere -- BEWARE!!! Actually, we decided we are extending and enhancing their life cycle by immortalizing them in art!!! (Hey, that's my story and I'm sticking to it!)

Monday, October 5, 2009

Playing with Wil - Part 1

Day of Discharge!!

Before Wil arrived I bought 5 yards of black Kona so we could play discharge! So, all the following discharge is done with bleach on Kona black, rinsed in plain water, then soaked and rinsed in Anti-Chlor, washed in regular laundry detergent and put in the dryer then ironed.

This one is all scrunched up and then wrapped tightly with rubber bands.
This one I rolled into a loose rope, folded it in half and then wrapped it with many tight ruber bands.
Potato Dextrin - Not at all like usine instant mashed potatoes with starch (something I won't ever do again!). We mixed the potato dextrin and applied it to the Kona black in varying thicknesses. The larger crackles are the thicker potato dextrin. It dried overnight and then I brushed on gel bleach (aka - toilet bowl cleanser!). Then followed the usual processing.
The next one I used apx 8 inches and the width of the fabric. Then I tied it in a series of knots down the length of the piece. The tied part is easy enough..........undoing it when it is wet is something else again.....and I have the aching fingers to prove it! Still........gotta LOVE the results!
This one was fan folded one direction and then fan folded again the other direction and then clipped all around the edge of the folded piece with clothes pins.
Planning to do more this week so stay tuned.

More Lino Cutting

OK, so I know it took me a while but I finally completed the second part of lesson 2. I had saved the cover to this magazine for a long time because I LOVE it! Didn't know what to do with it but I always knew it would end up as a piece of something I would do. Only bad part -- all the writing on it. So, knowing it was Tallinn, Estonia, I googled Tallinn and found the exact same picture. Here it is -- the inspiration for this lino cutting.

After printing the picture in black and white, I took it to be enlarged so I could cut it on a 12" X 12" piece of lino. Then I traced it onto a page protector so I could reverse it. I wanted the final print to look like the photo - not backwards. This also helped me decide which lines to leave in and which would not work out, etc. (for example.....some buildings now don't have the chimney they used to have!! LOL!!)
First I did a practice little piece (I'll show it later) to be sure which tool I could use to get the stone, tile, sea, sky, etc. effect I wanted. Then the cutting began........and went on.......and on........and on.......until finally I had it where I wanted it. (the shiny part is because it is wet just after washing off the paint.)


And here it is printed on white fabric. Wanted to see just how it would look, to check out if I need to make any corrections, additions, etc. Now I'll be looking to see how I want to add color to the print. So much fun!!!


Wednesday, September 23, 2009

New Class - Lino Cutting and Printing

Wow! Another class. It's been WAY too long! I am taking a class in cutting and printing lino taught by Dijanne Cevaal. So far I've finished lesson one and will download lesson two today.

First, here is the sampler I guess you could call it. It was great to see how each blade worked and what could be done with it. As you can see.....I perhaps took the term "gouge" a bit too literally in a couple of places!!! Oh and the red on this is NOT my blood, just some red paint that got on it.

Then I found a piece of "not exactly my favorite" hand dyed fabric....green in this case. Took yellow cream acrylic paint and applied it to the lino and then pressed it on the fabric.

Part two was to do a leaf in positive and negative. I found a great line drawing of a sycamore leaf that I liked so I used that design. The negative is on the left and the positive (which is a bit more difficult to see) is on the right.
Then printed it on the same green fabric but this time with red paint. Obviously, the positive print is on the right and the negative print on the left.
OK, so now onto lesson TWO!!!

Tuesday, July 14, 2009

Adaptation Challenge

One of the online groups I belong to is doing a challenge and the theme is ADAPTATION. Well, lately there has been a big adaptation in my life!

Here is the story -- Recently, our son, his fiance and his family (which includes 3 babies, and a 9yo son) moved in with us due to loss of jobs, economy, etc. Every other weekend we also have 3 more kids from Annette's previous marriage. To say it has turned my world upside down is actually an understatement. But I have "adapted" by counting my blessings and realizing that there are grandparents who hardly ever see their grandkids and kids. It has been quite an adjustment and still is at times. BUT, I'm flourishing in ways I hadn't thought of so it is working out pretty well.

The title of my piece is "Living Life Upside Down (and slightly off-kilter)". Hence the slanted shelf and upside down flower/vase and slanted window. The petals of the flower represent the four kids of mine (forward petals) and the three "adopted" ones (back petals). I chose a flower because I AM flourishing upside down!

The clock has all the numbers falling off it because I no longer seem to be able to maintain ANY form of schedule like I used to!

The rug and chair represent my studio (I have a big comfy chair and a rug that looks just like the one on this piece) which is right side up and not slanted because my studio is my haven, my sactuary, my calm in the storm.

One piece not on here yet will be their cat, Jack, peeking in through the window (he's an outdoor cat). I'm definitely not a cat person but have grown to respect Jack because he eats moles that dig up our yard!! So, I've adapted to him as well.

Short note: The stem on the flower in the final piece will be done with a satin stitch and curvey.

Here is the preliminary layout for the whole piece. I'm already working on some changes but I wanted to chronicle the process as well as the completed piece.

Keep watching!

Master Map - Part 2

So, today I'm back to my Master Maps. I took my first one and started making notations (since DH got me some wonderful markers yesterday!) I am using red to make notes about the flowers and green to make notes about the leaves and purple to make notes about the background! Ya gotta love the color coding bit!!!

The notes are about color and/or placement in front of or behind other pieces. Now from this I need to trace my individual pieces onto freezer paper! Now THAT should be interesting!

Monday, July 13, 2009

Fractured Flower - Placement Map and Choosing Fabric

Here's what I did in the studio today. Since I couldn't get to a sewing machine, I decided to go ahead and trace the Placement Map for the Fractured Flower project. I wanted to trace it before I made notes on the Master Map. (It wouldn't take much to get confused I'm thinking - don't need any extra markings when I'm trying to trace!)

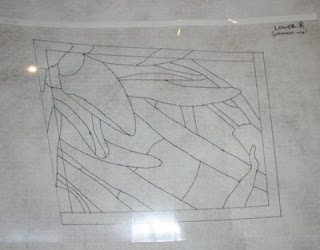
I used clear heavy duty packing tape to tape two transparencies together so they would be big enough to cover the master map. Then I traced all the lines onto the rough side of the transparencies.

Here is a detail of the tracing in process. Sorry about the flash reflection - I took many pictures and couldn't get it without one. This is the best shot.
Here is the completed Placement Map on a white background so you can see it.

So, Placement Maps for all four pieces are now complete. I wanted to start making notations on my Master Map but realized I didn't have the writing implements I wanted so I called DH and he is going to stop by Office Depot on the way home from work to pick them up for me. (What a great guy!!)
So, then -- what to do next??? I had already picked out a few oranges for this project but needed a bunch of other colors. Especially looking for the background pieces. So, I pulled out great stacks of colors from my stash and started going through them. (I'm SOOOOO thankful that my friend who helped me organize my studio recently insisted we organize my hand dyed fabrics by color families!!!!!!!! THANK YOU DIANA!!!!!) It made this part of the process so much easier! So far so good! I have found I think all of the ones I will need! Who knew all these years of hand dyeing and holding on to my fabrics would one day pay off so well??? I very well may not need to dye anything new for this project!!!

Hopefully tomorrow I'll be able to start making notations!
Is there anything more fun than working in the studio teaching two beginners??? Nope! Annette has NEVER sewn before except for a short bit in Home-Ec in school. Jeff used to sit on my lap and pick out stitches and guide the fabric but now he is big enough to reach the pedal! (OK, we have to put it on a box but still...........)


Jeff ( age 9) was looking through these cards we have (52 fun things to do with your grandchildren) and found one about making a flag. Needless to say, we had all the supplies needed. We pulled out the felt, scissors, paints, fabric scraps, glue, and the sewing machine and he got to work. Remember - his favorite color is orange! Here is the first session. BTW, he sewed the sleeve on all by himself!!

Then he thought it needed something more. He got out some more scraps and used several different stitch patterns to sew them together in two long strips. Then he decided to put them down the sides of the flag and just let them hang there. (They are uneven on purpose BTW). I'm so proud!!!!


Annette (DS's fiance) wanted to make quilts for the babies and picked out the Rail Fence pattern to start learning to piece and quilt. We were shopping for fabric for the twins when she found the middle fabric and it just SCREAMED Jayden. So we picked out the other two fabrics to go with it and she is doing all the cutting and stitching herself with instructions from me. Below are the blocks placed on the design wall. So far she has completed the top row completely (not shown yet). Wednesday she will be beginning the second row. She wants to have it completed by the end of the first week in August.


Here is a block so you can see the fabric that started it all!


It was SUCH a fun day in the studio! I did some work too besides instructing and answering questions. I'm posting about that separately in just a minute!


Saturday, July 11, 2009

Fractured Flower - Master Map part 1

Now to make the Master Map from which all parts are copied. Very important part of the process as I understand it.

First, here is the quarter of the picture I am using for this posting. It is the bottom left of the whole picture. You can see that I have drawn black lines to outline the parts I want to use as different fabrics, etc. This is so when I lay down the tracing paper it is easier to see (especially for older eyes like mine!!!)


I tried this first with tissue tracing paper. Although it worked just fine, I wasn't happy with the durability of it as a "MASTER" copy. Fortunately, I was looking for something else in a closet when I came across these large sheets of velum I had gotten for making templates when I was learning hand piecing. They are EXCELLENT for this project!! Easy to see through (easier than the tracing paper to be honest) and it is quite strong! Here is the tracing partially done.


The attached pieces need to match as well as possible so each quarter needs to run into the 1/2" inside borders. So, I slipped the adjoining piece under the velum to be as sure as I can that the lines meet. Below is a picture of that part of the process and a close-up picture.

Here is a shot of the tracing process completed.

And here is the completed tracing of the lower left quarter.
Now - on to figuring out all the notations that need to be made on the Master Map! I have to read the directions again to find out just what all needs to be on here.