One of the online groups I belong to is doing a challenge and the theme is ADAPTATION. Well, lately there has been a big adaptation in my life!
Here is the story -- Recently, our son, his fiance and his family (which includes 3 babies, and a 9yo son) moved in with us due to loss of jobs, economy, etc. Every other weekend we also have 3 more kids from Annette's previous marriage. To say it has turned my world upside down is actually an understatement. But I have "adapted" by counting my blessings and realizing that there are grandparents who hardly ever see their grandkids and kids. It has been quite an adjustment and still is at times. BUT, I'm flourishing in ways I hadn't thought of so it is working out pretty well.
The title of my piece is "Living Life Upside Down (and slightly off-kilter)". Hence the slanted shelf and upside down flower/vase and slanted window. The petals of the flower represent the four kids of mine (forward petals) and the three "adopted" ones (back petals). I chose a flower because I AM flourishing upside down!
The clock has all the numbers falling off it because I no longer seem to be able to maintain ANY form of schedule like I used to!
The rug and chair represent my studio (I have a big comfy chair and a rug that looks just like the one on this piece) which is right side up and not slanted because my studio is my haven, my sactuary, my calm in the storm.
One piece not on here yet will be their cat, Jack, peeking in through the window (he's an outdoor cat). I'm definitely not a cat person but have grown to respect Jack because he eats moles that dig up our yard!! So, I've adapted to him as well.
Short note: The stem on the flower in the final piece will be done with a satin stitch and curvey.
Here is the preliminary layout for the whole piece. I'm already working on some changes but I wanted to chronicle the process as well as the completed piece.
Keep watching!
Tuesday, July 14, 2009
Master Map - Part 2
So, today I'm back to my Master Maps. I took my first one and started making notations (since DH got me some wonderful markers yesterday!) I am using red to make notes about the flowers and green to make notes about the leaves and purple to make notes about the background! Ya gotta love the color coding bit!!!
The notes are about color and/or placement in front of or behind other pieces. Now from this I need to trace my individual pieces onto freezer paper! Now THAT should be interesting!
Monday, July 13, 2009
Fractured Flower - Placement Map and Choosing Fabric
Here's what I did in the studio today. Since I couldn't get to a sewing machine, I decided to go ahead and trace the Placement Map for the Fractured Flower project. I wanted to trace it before I made notes on the Master Map. (It wouldn't take much to get confused I'm thinking - don't need any extra markings when I'm trying to trace!)
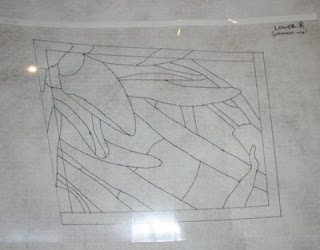
I used clear heavy duty packing tape to tape two transparencies together so they would be big enough to cover the master map. Then I traced all the lines onto the rough side of the transparencies.
Here is a detail of the tracing in process. Sorry about the flash reflection - I took many pictures and couldn't get it without one. This is the best shot.
Here is the completed Placement Map on a white background so you can see it.
So, Placement Maps for all four pieces are now complete. I wanted to start making notations on my Master Map but realized I didn't have the writing implements I wanted so I called DH and he is going to stop by Office Depot on the way home from work to pick them up for me. (What a great guy!!)
So, then -- what to do next??? I had already picked out a few oranges for this project but needed a bunch of other colors. Especially looking for the background pieces. So, I pulled out great stacks of colors from my stash and started going through them. (I'm SOOOOO thankful that my friend who helped me organize my studio recently insisted we organize my hand dyed fabrics by color families!!!!!!!! THANK YOU DIANA!!!!!) It made this part of the process so much easier! So far so good! I have found I think all of the ones I will need! Who knew all these years of hand dyeing and holding on to my fabrics would one day pay off so well??? I very well may not need to dye anything new for this project!!!
Hopefully tomorrow I'll be able to start making notations!
Labels:
adventure,
art,
fractured quilt,
inspiration,
journals,
studio time
Is there anything more fun than working in the studio teaching two beginners??? Nope! Annette has NEVER sewn before except for a short bit in Home-Ec in school. Jeff used to sit on my lap and pick out stitches and guide the fabric but now he is big enough to reach the pedal! (OK, we have to put it on a box but still...........)
Jeff ( age 9) was looking through these cards we have (52 fun things to do with your grandchildren) and found one about making a flag. Needless to say, we had all the supplies needed. We pulled out the felt, scissors, paints, fabric scraps, glue, and the sewing machine and he got to work. Remember - his favorite color is orange! Here is the first session. BTW, he sewed the sleeve on all by himself!!
Then he thought it needed something more. He got out some more scraps and used several different stitch patterns to sew them together in two long strips. Then he decided to put them down the sides of the flag and just let them hang there. (They are uneven on purpose BTW). I'm so proud!!!!
Annette (DS's fiance) wanted to make quilts for the babies and picked out the Rail Fence pattern to start learning to piece and quilt. We were shopping for fabric for the twins when she found the middle fabric and it just SCREAMED Jayden. So we picked out the other two fabrics to go with it and she is doing all the cutting and stitching herself with instructions from me. Below are the blocks placed on the design wall. So far she has completed the top row completely (not shown yet). Wednesday she will be beginning the second row. She wants to have it completed by the end of the first week in August.
Saturday, July 11, 2009
Fractured Flower - Master Map part 1
Now to make the Master Map from which all parts are copied. Very important part of the process as I understand it.
First, here is the quarter of the picture I am using for this posting. It is the bottom left of the whole picture. You can see that I have drawn black lines to outline the parts I want to use as different fabrics, etc. This is so when I lay down the tracing paper it is easier to see (especially for older eyes like mine!!!)
I tried this first with tissue tracing paper. Although it worked just fine, I wasn't happy with the durability of it as a "MASTER" copy. Fortunately, I was looking for something else in a closet when I came across these large sheets of velum I had gotten for making templates when I was learning hand piecing. They are EXCELLENT for this project!! Easy to see through (easier than the tracing paper to be honest) and it is quite strong! Here is the tracing partially done.
The attached pieces need to match as well as possible so each quarter needs to run into the 1/2" inside borders. So, I slipped the adjoining piece under the velum to be as sure as I can that the lines meet. Below is a picture of that part of the process and a close-up picture.
Thursday, July 9, 2009
Fractured Flower - Just Starting
YEAH! In an online group I'm a part of - we are doing a Fractured Flower quilt. I had seen these done a while ago on Simply Quilts and at the time thought that would be one of the most exciting projects!! Well, now I get to do one!
This one is meant to stay fairly true to color and design - read very precise (yeh, I know....but I'm gonna try anyway! LOL!) It is the picture of a flower which the hostess divided into four pieces. Each piece is to be treated like an individual quiltlet except that they should all match well at the areas that join together. When we have completed our four pieces, they are returned to the hostess and she will mix them up with the other three in my group and send me back one of my pieces and one piece from each of the other three in my group. Then I will sew them together to make one quilt!!!
So, want to go on this journey with me?????? Good! Here we go!!!......................
I just received my four pieces of the photo a couple of days ago. Isn't it a beautiful flower? I first started going through my hand dyed fabric stash to pull out oranges, yellows, golds, purples, greens, etc. I actually had more than I had thought I would.
Now to make all the tracings, master maps, etc. From what the hostess said....this is the difficult part. Below are my four pieces. I have traced out the major outlines with a Sharpie to make them easier to trace. One piece of advice...........don't drink a lot of coffee before you attempt this!
Now on to the next stage (probably tomorrow) - making the master map!
Labels:
art,
creative journey,
creativity,
fractured quilt,
risk taking,
studio time
Subscribe to:
Posts (Atom)